Emails
Design, send and track the emails you send to your contacts — from a one-off announcement to a regular newsletter.
What it's for
Email is where most marketing plans still start. GoodBards keeps the whole job in one place: you pick a look, write the message, choose who receives it, and see how it performed — without exporting lists or switching to a separate email tool.
Because your emails sit alongside your contacts, anything you already know about your audience is available when you choose recipients.
Before you start
- At least one contact in Audience → Contacts, or a mailing list to send to.
- Your Brand Kit set up, if you want emails to pick up your colours and logo automatically. See Brand Kit.
How to create an email
- In the sidebar, choose Marketing → Emails.
- Choose + Create Email.
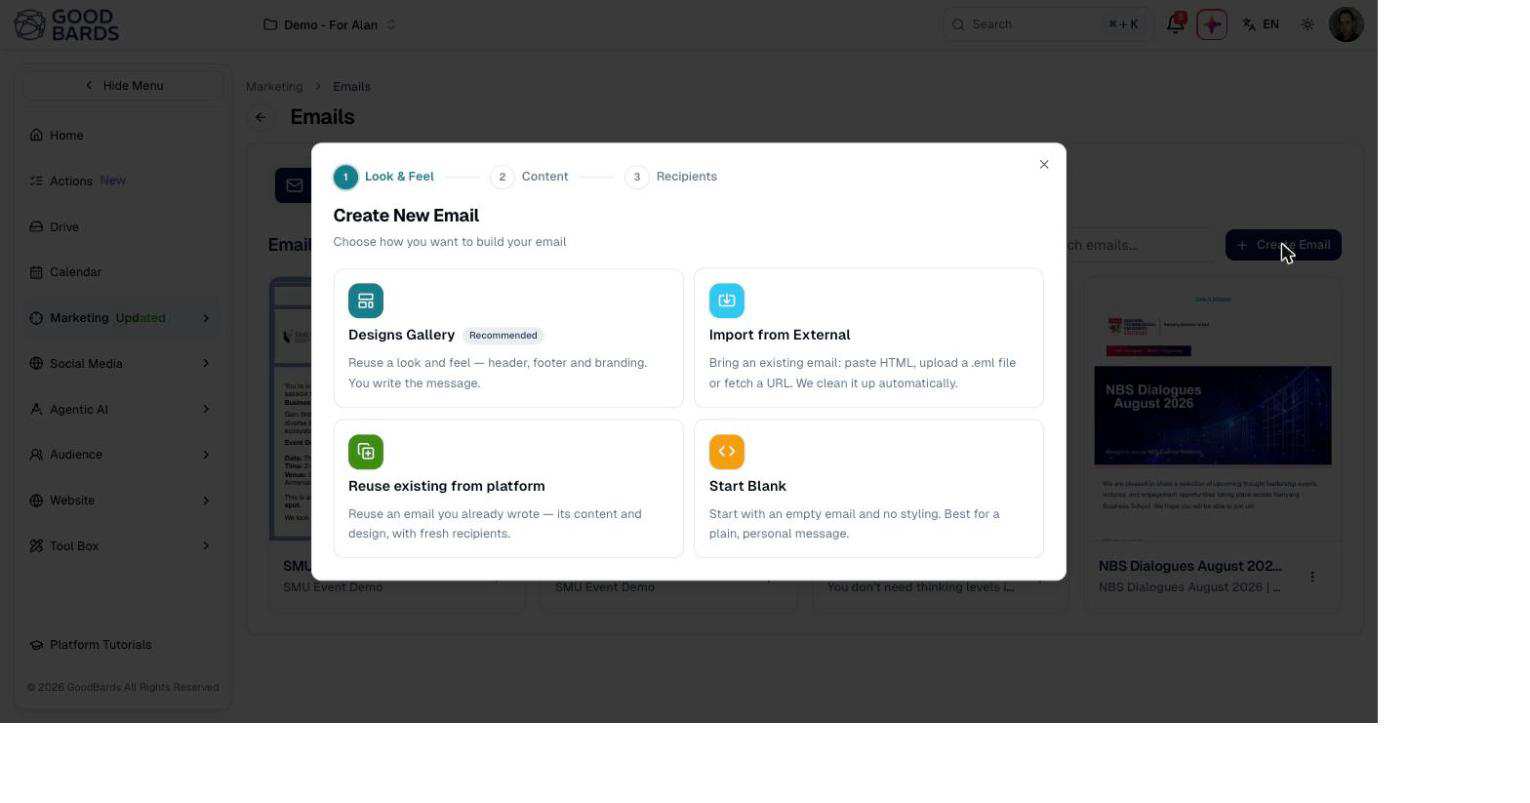
- Pick how you want to start. GoodBards offers four options:
| Option | When to use it |
|---|---|
| Designs Gallery | The usual choice. Reuse a look and feel — header, footer and branding — and just write the message. Marked Recommended. |
| Import from External | You already have the email elsewhere. Paste HTML, upload a .eml file, upload a .zip export (for example from Canva), or fetch a URL. |
| Reuse existing from platform | Send something you have written before, with fresh recipients. |
| Start Blank | An empty email with no styling. Best for a plain, personal message. |
- Work through the three steps at the top of the dialog: Look & Feel, then Content, then Recipients.
- Preview your email before sending, and send yourself a test if you can.
Reuse beats starting over
If you send a similar email regularly, Reuse existing from platform keeps the content and design and only asks for new recipients — usually faster than building it again.
Importing a design from Canva
Canva exports an email as a .zip holding the email's HTML and its images.
- In Canva, export your email design. Keep the
.zipas it is; there's no need to unzip it. - In Create Email, choose Import from External, then the
ZIP (Canva) tab, and drop the
.zip. Any.zipwith one HTML file and its images works the same way. - Choose Analyze & clean up. The report lists what the file contained:
the images found, any image the HTML uses but the
.ziplacks, and files that won't be used. - Check the Import name. It names the email and the folder its images go to.
- Continue through Scope and Images. The images are copied to Drive › My Documents › Images › your import name and made public so recipients can see them; the email points at those copies.
Good to know:
- The plain-text version of the email is created from the HTML, with its
links. The
.txtfile in Canva's export is not used. - Canva's unsubscribe link is converted automatically. If an email has no unsubscribe link, the report warns you: add one, or use a Design whose footer has it, before sending.
- If the design uses a font recipients don't have (Canva's brand fonts, for example), the report names it and the font they'll see instead.
- SVG images are not imported: Gmail and Outlook don't display them. Export them from Canva as PNG instead.
Editing an email
Choose an email's preview in the gallery to open it. Its page shows the subject and the body as recipients will see it, with an Edit button on each, and Send Test Email.
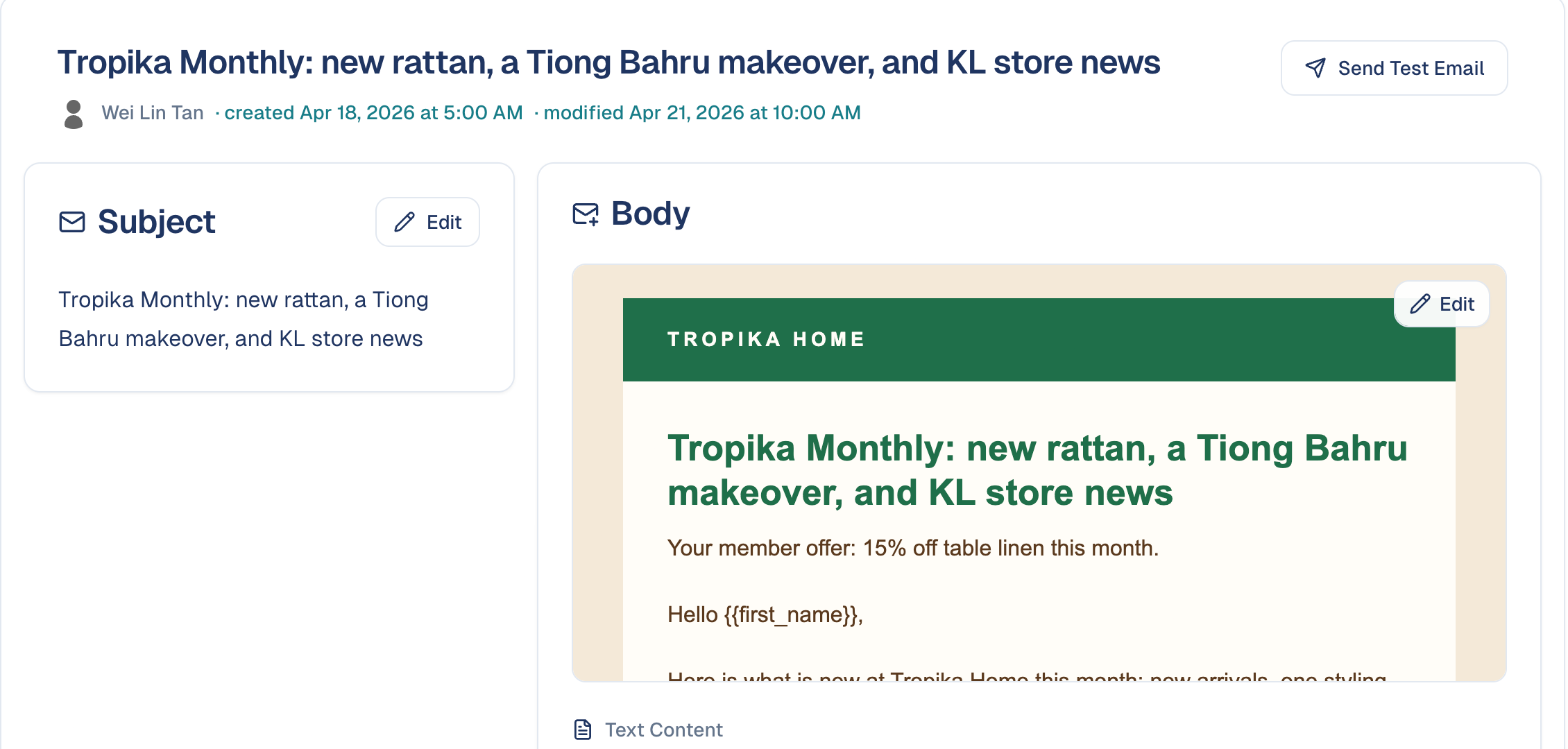
Edit on the body opens the editor. The design (header and footer) is locked: you edit only your content inside it.
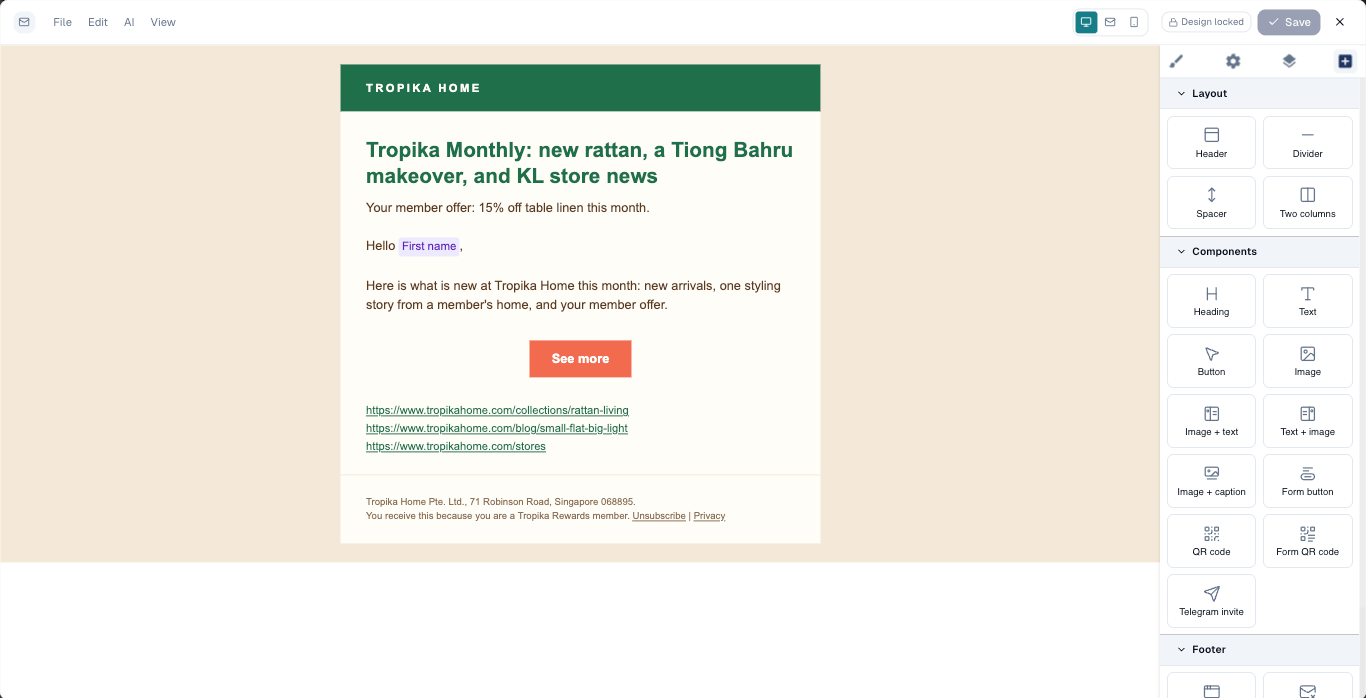
Across the top of the editor are the menus File, Edit, AI and View. On the right are the width buttons, Save and ✕.
The View menu switches between three ways of working:
- Visual editor: click any text to change it; drag blocks from the right (heading, text, button, image, two columns, divider…). Personal fields such as First name are filled in for each recipient; see Personalising an email.
- HTML code: edit the HTML directly.
- AI assistant: describe the change, for example make it shorter and warmer. You can also paste links: write a newsletter from these posts followed by up to three web addresses builds a section per post, with a "Read more" link to each. The pages are read before the AI writes, and the panel tells you which ones it could read; a page whose owner blocks automated access is named, not guessed at. AI → Improve with AI (or ⌘J) opens it too.
Building your email with blocks
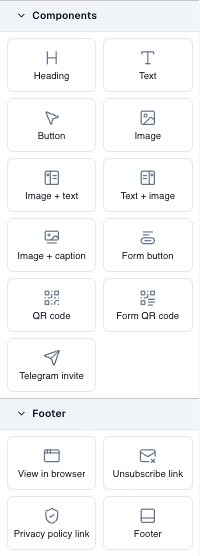
An email is built from blocks stacked one under the other. The panel on the right lists them in three groups. Drag a block onto the email where you want it, then click into it to change the text, or select it to change its settings.
| Group | Blocks | Use them for |
|---|---|---|
| Layout | Header, Divider, Spacer, Two columns | The structure: your logo at the top, side-by-side content, space between parts. |
| Components | Heading, Text, Button, Image, Image + text, Text + image, Image + caption, Form button, QR code, Form QR code, Telegram invite | The message itself. Form button and Form QR code ask you which of your forms to open. |
| Footer | View in browser, Unsubscribe link, Privacy policy link, Footer | The links every marketing email needs, ready to drop in. |
Your brand is applied for you
Blocks take the colours, fonts and logo of your Brand Kit as you drop them. You can still change any of them in the block's settings.
The footer: unsubscribe and privacy links
The Footer block is the quickest way to end an email properly. It holds, in one block:
- your company name and address, taken from your Brand Kit;
- an Unsubscribe link, personal to each recipient;
- a Privacy policy link to your default privacy statement.

When your email uses a design, its footer is part of the design and is locked (Design locked at the top of the editor): it already has these links.
Building your own footer instead? Drop the Unsubscribe link and Privacy policy link blocks into it one by one. View in browser goes at the very top of the email, for recipients whose email app does not display it well.
Never send without an unsubscribe link
People must always be able to stop your emails (PDPA in Singapore, and Gmail and Yahoo require it from bulk senders). If an email has no unsubscribe link, its page warns you: add the Footer or the Unsubscribe link block before sending.
The links are filled in when the email is sent
In the editor the links are placeholders. Each recipient gets their own unsubscribe link when the email goes out. View in browser works only in emails sent from a campaign tactic, and without a default privacy statement the Privacy policy link is left out.
Opens are tracked automatically: there is nothing to add to your email for that.
In the visual editor, Desktop, Email width and Mobile show the email at each size. In the other two views, a Visual editor button takes you back to the canvas. View also offers Show outlines and Preview, and Edit has Undo and Redo.
Choose Save (or ⌘S) to keep your changes; Unsaved changes shows while there is something to save. ✕ (or Esc) closes the editor: if you changed something, it asks Discard changes? first. When you are writing a new email, the button reads Apply instead of Save: the body goes back into the email, which you then save.
The card menu in the gallery also offers Show Tactics (where the email is used), Duplicate, Attach to tactic and Delete.
Personalising an email
A personal field is a placeholder between double curly braces, such as
{{contact_firstname}}. When the email is sent, each recipient gets their own
value in its place. Fields work in the subject as well as in the body.
- Open the email and choose Edit on the subject or the body.
-
Type the field where the value should appear, braces included. In the Visual editor, type it into any text; in HTML code, anywhere in the HTML.
-
Choose Save, then Send Test Email to check it.
The fields you can use:
| Field | Filled with |
|---|---|
{{contact_firstname}} |
The recipient's first name |
{{contact_lastname}} |
The recipient's last name |
{{contact_email}} |
The recipient's email address |
{{contact_phone}} |
The recipient's phone number |
{{contact_job_title}} |
The recipient's job title |
{{company_name}} |
The company name, when the tactic sends one email per company |
{{unsubscribe_url}} |
The link to unsubscribe. Every design's footer already has it. |
{{privacy_policy_url}} |
The link to your privacy statement |
{{view_in_browser_url}} |
The link to open the email in a browser |
Good to know:
- A field the recipient has no value for is left blank. Hi {{contact_firstname}}, becomes Hi , for a contact without a first name. Keep names for lists you know are complete, or write the greeting so it reads well without one: Hello {{contact_firstname}} rather than Dear {{contact_firstname}},.
- Test emails use your own contact record. The field is filled only when the address you send the test to exists in Audience → Contacts. Otherwise it shows blank in the test, and works for real recipients.
- Spell fields exactly as above.
{{first_name}}or{{FirstName}}, which other tools use, are not recognised and show as???in the sent email. If you import an email from Canva or another tool, replace its fields with the ones in the table.
Attaching an email to a tactic
An email is sent from a campaign tactic: the tactic holds the audience, the sender and the send button. Attach to tactic in the card menu links the email to one, in three ways:
- Existing tactic: pick a campaign, then one of its email tactics. Only tactics that can still take the email are listed: a tactic sends one email, so those that already sent theirs, and closed tactics, are left out. A tactic whose email is still a draft, failed, or scheduled is listed with that email's name; attaching replaces it after you confirm. The audience and the sender stay; a scheduled send is cancelled, and you schedule the new email again from the tactic page.
- New tactic in a campaign: pick a campaign and name the tactic; it is created as a draft with the email attached.
- New campaign: name the campaign, choose its objective and name the tactic; both are created with the email attached.
Each option opens the tactic page, where you set the recipients and send.
Finding your emails
Everything you have created is listed under Email Gallery, on the Emails tab. Use the search box to find one by name, and the buttons beside it to switch between grid and list view.
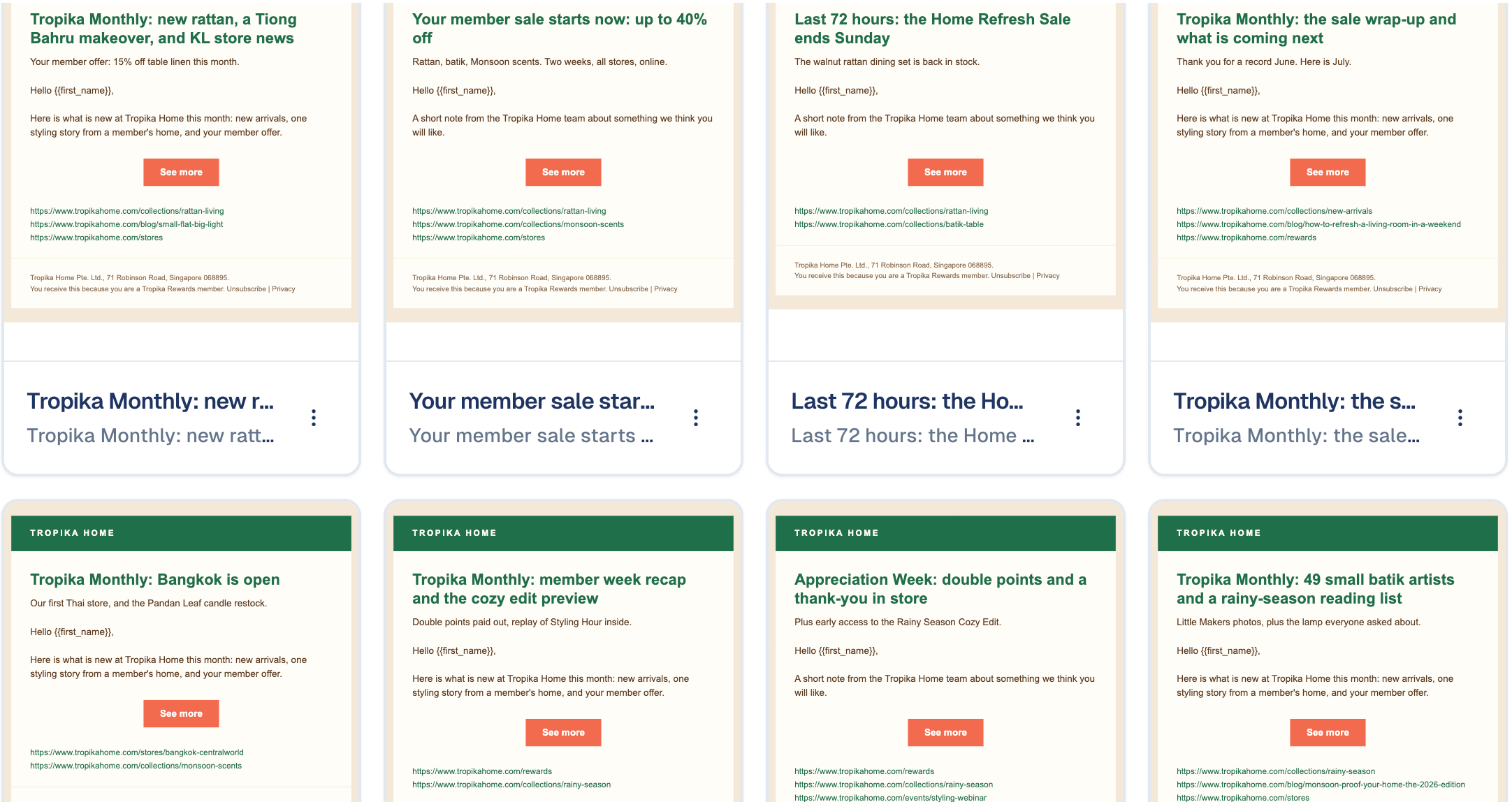
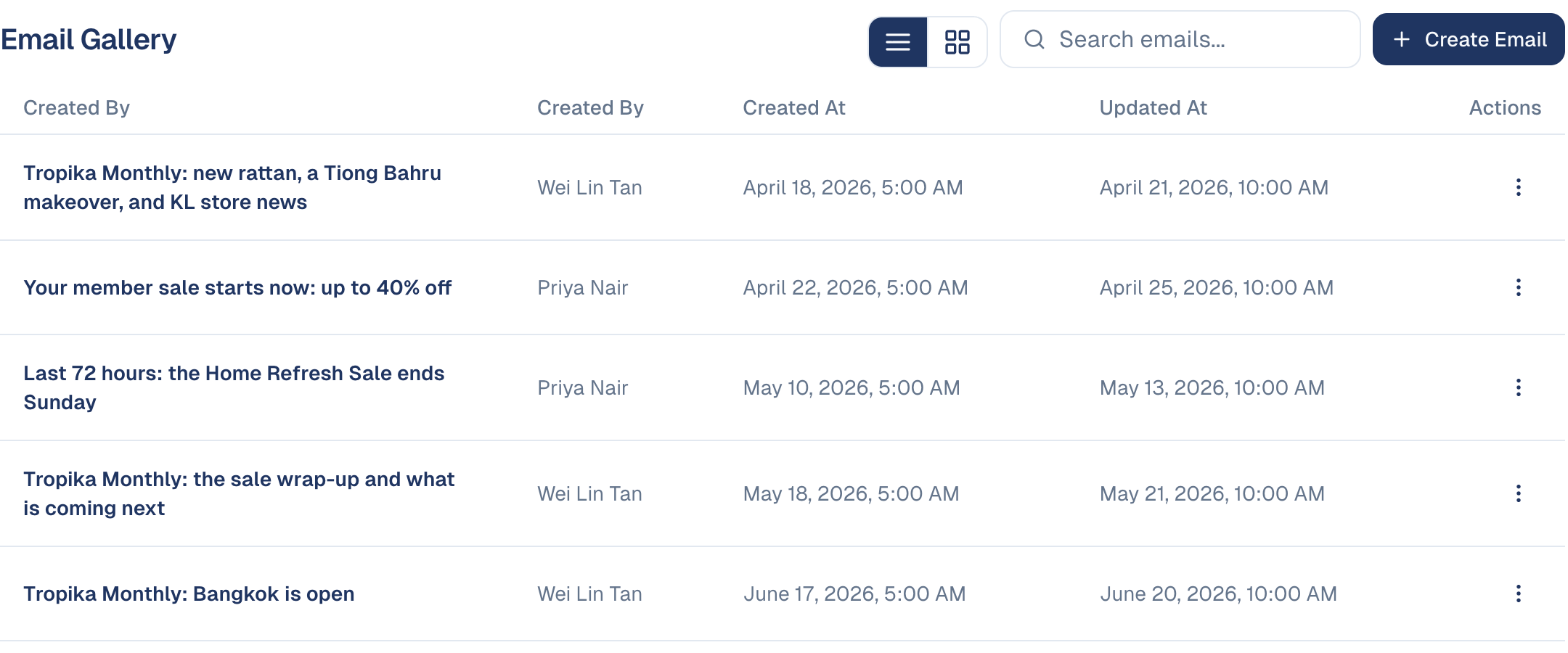
The Email Designs tab holds the reusable looks — headers, footers and branding — rather than individual messages.
Good to know
- Emails and designs are separate. A design is the wrapper you reuse; an email is one message you send. Editing a design does not rewrite emails already sent.
- Check the preview before every send. Email clients vary, and a layout that looks right in the editor can shift in Gmail or Outlook.
- Sent emails cannot be recalled. Confirm your recipient list before the final step.
Still stuck? Contact support.